scrivener tips

NaNoWriMo Tips for Writing with Scrivener – Taking Notes

The blog for Literature and Latte, the makers of the popular writing tool, Scrivener, offer tips for NaNoWriMo on inline annotations, notes, and keeping track of inspiration that hits during the month-month writing marathon.

Since the daily word count is the main goal of the project for most people, this is okay. However, if you are also working toward the goal of producing something worthy of publishing—or at the very least, something you can be proud of—you might wish to somehow mark passages of text that you do not feel happy with, without completely deleting them or excluding them from the total counted work. There are a few ways of doing this in Scrivener.

The tips highlight the many ways a writer can take notes during the writing process in a way that doesn’t interrupt the creative workflow too much. This applies to the writing workflow and process beyond the scope of NaNoWriMo as well.

Using Scrivener for Poetry

The Scrivener Basics Workshop by Writers in the Grove begins September 21, 2017, Thursday at 6:30Pm at the Forest Grove Senior and Community Center in Forest Grove, Oregon. There is still space available.

Scrivener isn’t just for writing and publishing fiction or non-fiction. Many successful poets use the power of Scrivener to not just create their poetry books, but also to track poetry submissions to contests, magazines, and other publishing media.

Here are some resources to learn more about how poets are using Scrivener for their own poetry books and for anthologies.

Writing Tips for Organizing and Planning Your Writing

There are two aspects to the concept of organization for writers. There is the organization of your writing environment, be it your working space or virtual space you write in such as the type of computer, software, even the way your writing is backed up. Then there is the organization of the actual writing, keeping track of characters, plots, story lines, names, places, etc., and structuring the end result into something readable as well as publishable.

Discussing this with a few Writers in the Grove members, we realized that while the two concepts were separate, they were actually inseparable. As one pointed out, the spark of an idea can happen anywhere and you must have a system in place to jot it down and ensure it isn’t lost between the grocery store moment of inspiration and the moment you can finally lean into your computer and start writing. Throughout the writing process of a project, the project is with you, wherever you are, whenever your imagination catches fire. A well-structured habit system combined with well-maintained tools and access points for preserving those thoughts help you through the entire process, right through to the point of publishing.

So we decided to offer this short collection of writing tips by others for organizing and planning your writing to embrace both aspects, helping you be organized within your writing environment, physical and virtual, and in the writing process.

Writing Organization Tools and Environments

One tool that our group embraced that changed more than a few writing lives is Scrivener by Literature and Latte. Available for both Windows and Mac, Scrivener is what you use to write your story before you move it to publishing programs and tools, though Scrivener will publish directly to various ebook and print formats. Scrivener is your idea holder, notebook, character development tool, and story line planner. It helps you write your book or whatever is on your writing list. We highly recommend it and have an ongoing series to help you learn Scrivener better.

Some helpful articles on using Scrivener to organize your writing include:

How To Organize Your Non-fiction Book – The Future of Ink: This article offers six core tools and methods for organizing your book: piles, folders, cards, Evernote, and binders. The author also mentions Scrivener as it is highly capable of embracing piles, folders, cards, etc. The article offers tips for organizing your writing in general, time and space for writing, and more tips to help you keep on track of the writing. These apply to fiction as well as non-fiction. (more…)

Scrivener Tips: The Scratch Pad

This is another Scrivener Tip from Writer’s in the Grove. We will be presenting a series of Scrivener workshops soon in Forest Grove, Oregon. Until then, or after, if you have a question about how to use Scrivener, let us know and we’ll do our best to help you out.

Scrivener - Scratch Pad on Tools Menu - Writers in the Grove.
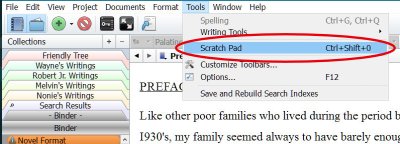
Ever get a new idea, a bit of inspiration, as you are writing? I used to turn to a piece of paper or sticky note to jot down my idea, but found that by the time I made the note and switched back to my writing program, I’ve lost track of what I’m writing. Moving my eyes from the computer screen and fingers from the keyboard invites distraction. Luckily, Scrivener offers a way to make notes and keep on writing.

The Scrivener Scratch Pad is built into Scrivener and can be accessed by:

  • Windows: Tools > Scratch Pad or CTRL+ALT+SHIFT+P
  • Mac: SHIFT+CMD+ENTER

You can add a note to it quickly with a mouse from within the Scratch Pad window. Click the T for Text in the bottom left corner to create a new note and start typing.

Scrivener Scratch Pad - examples - Writers in the Grove.

You can add as many notes as you wish in the Scratch Pad.

You can send the note to Scrivener later as the start of a new plot shift or poem.

  1. Select the note.
  2. Click Send file to Scrivener.

Two options will appear to either copy it to a specific file or new one, or append text to another text, adding it to the bottom. You can also select a portion of the note and send just the selected text.

One of the cool things about the Scratch Pad in Scrivener is that the notes persist between projects. You can make notes on other projects that pop into your head or you discover while researching another project. Think of all the ways you can use the Scratch Pad in Scrivener to deal with these thoughts while staying focused on the task at hand.

For more tips, see “Using the Scratch Pad in Scrivener” by The Digital Researcher, and the following:

Scrivener: Printing Your Manuscript

Scrivener_-_Compile_Contents_ScreenThe process of printing a manuscript in Scrivener is called compiling. It represents the power in Scrivener to literally compile your writing how you wish it to appear in print or in a digital file for the next steps in preparing your book for publishing.

In one of my Scrivener projects, I have 6 versions of a book I’m working on.

  • The original draft
  • Second and third drafts
  • A copy edited version returned from a copy editor
  • The cleaned up version of that copy editor
  • Another version with alpha reader edits added

I could have even more versions, and at any time along the process of writing I could print out any of these versions for posterity, or go back to an earlier version to find out why I wrote it that way or what an editor had to say, or restore an edited version to one of the original versions, all within the same project file.

When it comes time to print these versions, or the final glorified version of my manuscript, it begins with a compilation process as I choose which documents to include or exclude from the version I’m creating – or, in Scrivener language, compiling.

Remember, as discussed in the tutorial on how to format your manuscript for writing, what appears on the screen may be different what the final version prints. (more…)

Scrivener: Formatting Your Manuscript for Writing

I’ve been asked to continue this ongoing series on how to use Scrivener, a powerful writing tool that is a must for many professional writers. Scrivener works for those writing poetry, fiction, non-fiction, screenplays, and…the list is long. It is a pre-production tool, a tool for the writing and development of your material for publishing. While Scrivener includes the ability to export the information as an ebook and material ready for publishing, it isn’t designed as a tool for publishing a pretty book. It is the workhorse that gets you to that point.

Scrivener is software installed on your Windows or Mac machine and is produced by Literature and Latte. The price is very reasonable and the purchased version of Scrivener maybe installed on your desktop and laptop without problems so you may work in both environments.

So far in this series we’ve covered:

In this part of the series, I’ll cover how to set the standard format for new documents, the process of fixing content that comes in a jumble in formatting, and how to set the default or standard format for new documents in Scrivener projects.

Setting the Standard Format for New Documents

Let’s begin with how to set the standard formatting for new documents in Scrivener, projects you are just starting. I’ll cover the process for Windows machines. It might be slightly different for Mac. (more…)

NaNoWriMo: Beat Sheets and Story Engineering Worksheets

There are some terms you need to know if you will be participating in NaNoWriMo this year.

  • Plotter: A writer who plots out their story with an outline, which they tend to follow for the most part during NaNoWriMo.
  • Pantser: A writer tackling NaNoWriMo with little planning and forethought, just writing by the seat of their pants.

A few years ago, a new term arose, brought to light by Angela Quarles, self-labeled a Geek Girl Romance Writer. She also offers writing advice, tutorials, and tools to help writers.

In her post about her experience and the lessons learned, she describes the two key types of writers who participate in the National Novel Writing Month challenge, and invented her own type called plotser:

What’s a plotser? A cross between a pantser and a plotter, with maybe a wee bit more emphasis on the pre-plotting.

With Hurricane Sandy and other circumstances, my new agent (signed only on Oct 4) and I weren’t able to coordinate on what direction to take for a sequel to MUST LOVE BREECHES. So for most of October, I wasn’t even sure if I was participating in NaNoWriMo. Then at the end of the month, I decided to take up a premise that had nothing to do with BREECHES so I wouldn’t waste my time writing a sequel she didn’t want.

However, that meant I’d not spent time plotting at all.

I had what I thought was a fun premise and a sense of who the H/h were and so started one day late on November 2. I caught up with everyone over the weekend and was doing swimmingly until about Day 5, then my word count dribbled downward and things ground to a halt. I had no idea where I was going with this and I didn’t like feeling that way. This wasn’t the normal ‘what I’m writing is drivel’ feeling, I really felt like all my characters were just spinning their wheels waiting for something to happen. Like the plot. Ugh.

A local writer friend sagely advised me to take a break for a week, two weeks, to figure out the plot and then do a FastDraft blitz at the end. So I did! I ended up creating a spreadsheet to help myself stay focused on what I needed to discover…

As a result of her experience, she created the Story Engineering Worksheet (Excel Spreadsheet), a spreadsheet created in Excel that breaks down all the elements of a novel into their finest detail. To download, click, on the link or right click and save to your hard drive.

Described as a “mix of the four act/part structure, and beat sheets,” the worksheet is based on the spreadsheet by Jamie Gold called a beat sheet, a worksheet that structures your plot all on one page.

Described by Storyfix in their Lessons for Writers:

The “beat sheet” is a way to sequence your story, using bullets instead of whole sentences or paragraphs.

Yes, this is an outline, but it is more than that. It is a scene structure for your novel built around basic plot points or story arcs. (more…)

NaNoWriMo Novel Template for Scrivener

We’ve several members prepping for NaNoWriMo this year, the annual National Novel Writing Month where writers commit to write 50,000 words in 30 days through the month of November. We’ve put together “It’s NaNoWriMo Time: How To, Tips, Techniques, and Survival Advice” to help you as well.

For those using Scrivener to write and track their daily targets of 1,667 words, Scrivener is not only offered for 20% off during NaNoWriMo, but they also have a NaNoWriMo Novel Template to help you keep track of your progress.

Download and install the free (or paid) version of Scrivener. You will find all the information including tutorials and the template file on their Scrivener NaNoWriMo 2015 Offers web page.

NaNoWriMo Novel Template Setup.To install the NaNoWriMo Novel Template:

  1. Scroll to the bottom of the 2015 offers web page and look for the title The NaNoWriMo Novel Template
  2. Click or right click and save the ZIP file for the version of Scrivener you are using (Mac or Windows)
  3. Extract the scrivtemplate file to the directory where Scrivener is installed and the subdirectory called ProjectTemplates.
    • The location on your computer is typically C:\Users\UserName\AppData\Local\Scrivener\ProjectTemplates
  4. Open Scrivener and go to File > New Project
  5. Switch to the Fiction Templates
  6. Look for a template titled NaNoWriMo Novel Template and select it
  7. Type in a file name such as “My November 2015 Novel Draft” and choose the folder in which to store the files within your Documents folder
  8. Click Create
  9. The first document you will see contains all the instructions you need to understand how to use the template during NaNoWriMo.

NaNoWriMo Novel Template Instructions.

To get started on November 1, go to Project > Project Targets and drag that pop-up window to a location where it doesn’t interfere with your writing. Start writing, and glance over after 45 minutes or so to see how you are doing. (more…)

Scrivener: Names and Autocomplete

In this ongoing series on Scrivener, you should have the basics under your belt. Let’s dive a little deeper into those basics with your new imported project or with the blank project we created early on in these tutorials. In this tutorial I’ll cover the Name Generator and Autocomplete Suggestion features in Scrivener.

One of the great tools Scrivener includes is a Name Generator. It helps you to generate possible character names.

To access it, go to Tools > Writing Tools > Name Generator.

Scrivener - Tools - Options - Writing Tools - Name Generator - Lorelle

The Name Generator generates random character names and can be customized to generate names specific to region and cultural areas for male, female, or both. You can set the the generator by first and last name letters or include specific letters. You can even search for names with specific meanings. (more…)

Scrivener: Import Documents and Files

Throughout this ongoing series on Scrivener so far, you’ve been experimenting with a blank project. I highly recommend my students learn first with a blank project so they can screw it up and experiment thoroughly before they start importing their own writing. Few listen. Either way, it’s time to talk about how to import your writing into Scrivener, and practice first on your experimental project.

There are two ways to get your content into Scrivener.

You can copy and paste from your word processor. Take care doing this as it will often bring in code and formatting that you might wish to remove later. You can also import the content directly into Scrivener.

We will cover both methods, but to do this right (or at least wiser), start with formatting a blank Scrivener project.

Remember, importing your writing into Scrivener makes a copy of the original files. It does not modify them. They remain untouched. Save them off your computer in a protected and secure place as backups.

Formatting a New Project

Go to Tools > Options > Editor.

Scrivener - Options - Editor - Interface - Lorelle

This is where you format Scrivener for what you will use on the screen. This is NOT how the document will look when published. Get that thought out of your head immediately.

The Editor creates your writing environment. How do you wish to write? Single spaced lines? Double spaced? Wide margins? Narrow? Indented paragraphs? Not? Large fonts? Serif or sans-serif fonts?

With the Editor, you can set up a writing environment the way you wish to write. When the writing is compiled (exported), you may control the end result there.

Changing the formatting of the Editor is best done before you add your writing. It applies only to new documents, not previous ones. I’ll cover how to fix the older styles and formatting in another tutorial. (more…)