writing tools

Writing Tips for Organizing and Planning Your Writing

There are two aspects to the concept of organization for writers. There is the organization of your writing environment, be it your working space or virtual space you write in such as the type of computer, software, even the way your writing is backed up. Then there is the organization of the actual writing, keeping track of characters, plots, story lines, names, places, etc., and structuring the end result into something readable as well as publishable.

Discussing this with a few Writers in the Grove members, we realized that while the two concepts were separate, they were actually inseparable. As one pointed out, the spark of an idea can happen anywhere and you must have a system in place to jot it down and ensure it isn’t lost between the grocery store moment of inspiration and the moment you can finally lean into your computer and start writing. Throughout the writing process of a project, the project is with you, wherever you are, whenever your imagination catches fire. A well-structured habit system combined with well-maintained tools and access points for preserving those thoughts help you through the entire process, right through to the point of publishing.

So we decided to offer this short collection of writing tips by others for organizing and planning your writing to embrace both aspects, helping you be organized within your writing environment, physical and virtual, and in the writing process.

Writing Organization Tools and Environments

One tool that our group embraced that changed more than a few writing lives is Scrivener by Literature and Latte. Available for both Windows and Mac, Scrivener is what you use to write your story before you move it to publishing programs and tools, though Scrivener will publish directly to various ebook and print formats. Scrivener is your idea holder, notebook, character development tool, and story line planner. It helps you write your book or whatever is on your writing list. We highly recommend it and have an ongoing series to help you learn Scrivener better.

Some helpful articles on using Scrivener to organize your writing include:

How To Organize Your Non-fiction Book – The Future of Ink: This article offers six core tools and methods for organizing your book: piles, folders, cards, Evernote, and binders. The author also mentions Scrivener as it is highly capable of embracing piles, folders, cards, etc. The article offers tips for organizing your writing in general, time and space for writing, and more tips to help you keep on track of the writing. These apply to fiction as well as non-fiction. (more…)

NaNoWriMo Tips: Your Writer’s Toolbox

Here on Writers on the Grove, we’ve been adding articles to help you add to your writer’s toolbox. A writer’s toolbox is a collection of reference material that helps the writer write.

Your writer’s toolbox could be digital, files stored in a folder on your computer. Or it could be in a file folder grouped by type of reference. Or in a notebook, the preferred method of many writers, with tabs segregating the various reference types.

Your writer’s toolbox isn’t limited to a single project, novel, or writing type. It is a reference guide to support your writing needs such as a list of common measurement conversions from metric to imperial, forms and templates for character and worldbuilding development, descriptions of genres and themes, cheat sheets, and whatever you need to keep you writing.

Whatever your method of storage, before, during, and after NaNoWriMo is the time to put that toolbox in order to help you write your stories.

What Goes Into Your Writer’s Toolbox

What goes into your writer’s toolbox? Anything that helps you write. Here are some examples:

  • Peter Halasz’s Writing Cheatsheet is a tightly packed collection of plot and character guides, specifics, and breakdowns.
  • Forms for character descriptions and personality traits.
  • Forms for place/location descriptions.
  • Forms for worldbuilding.
  • Plot and storyboarding guides and forms.
  • Notes from writing workshops and classes.
  • Pictures of places and characters.
  • Mind mapping forms.
  • Genre descriptions.
  • References that list reference material such as geometric shapes, how to describe and critic art, names and descriptions of shoe typing techniques, a reference guide for typical travel times for various forms of transportation, hair colors and hair style descriptions and names, measurement conversion charts, color names, whatever it is that you can flip to and glance at for the answer, and keep writing.

Some writers create a book for each project they are writing. Others keep one book as a reference guide and keep adding to it as they learn new writing techniques and find references.

It is your writer’s toolbox, and you get to choose whatever tools you need in your kit to keep you going through all your writing projects.

You can find more writing tips, NaNoWriMo prompts, and writing tips for NaNoWriMo on our Writers in the Grove site.

Scrivener Tips: The Scratch Pad

This is another Scrivener Tip from Writer’s in the Grove. We will be presenting a series of Scrivener workshops soon in Forest Grove, Oregon. Until then, or after, if you have a question about how to use Scrivener, let us know and we’ll do our best to help you out.

Scrivener - Scratch Pad on Tools Menu - Writers in the Grove.
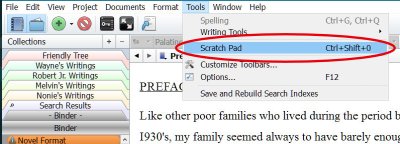
Ever get a new idea, a bit of inspiration, as you are writing? I used to turn to a piece of paper or sticky note to jot down my idea, but found that by the time I made the note and switched back to my writing program, I’ve lost track of what I’m writing. Moving my eyes from the computer screen and fingers from the keyboard invites distraction. Luckily, Scrivener offers a way to make notes and keep on writing.

The Scrivener Scratch Pad is built into Scrivener and can be accessed by:

  • Windows: Tools > Scratch Pad or CTRL+ALT+SHIFT+P
  • Mac: SHIFT+CMD+ENTER

You can add a note to it quickly with a mouse from within the Scratch Pad window. Click the T for Text in the bottom left corner to create a new note and start typing.

Scrivener Scratch Pad - examples - Writers in the Grove.

You can add as many notes as you wish in the Scratch Pad.

You can send the note to Scrivener later as the start of a new plot shift or poem.

  1. Select the note.
  2. Click Send file to Scrivener.

Two options will appear to either copy it to a specific file or new one, or append text to another text, adding it to the bottom. You can also select a portion of the note and send just the selected text.

One of the cool things about the Scratch Pad in Scrivener is that the notes persist between projects. You can make notes on other projects that pop into your head or you discover while researching another project. Think of all the ways you can use the Scratch Pad in Scrivener to deal with these thoughts while staying focused on the task at hand.

For more tips, see “Using the Scratch Pad in Scrivener” by The Digital Researcher, and the following:

Prompt: A Roll of the Dice

Attending a weekend writing retreat led by science fiction author Nina Kiriki Hoffman, Writers in the Grove member, Lorelle VanFossen received permission from Nina to introduce our group to The Story Catcher technique she developed. The following is a summation of the technique for inspiring writing prompts based upon random words and phrases. The document used for the prompt exercise is available for download and printing in a link at the bottom of this post.

Collection of multi-sided, colorful dice.A prompt is anything that inspires you, the writer, to write. It could be a word, a phrase, an idea, and the source of the inspiration could come from anywhere or anything at any moment. The prompt this week was also a workshop on generating random prompts.

How would your writing change if you could generate the serendipity of your prompts on a regular basis, possibly turning it into a habit, a writing exercise used daily?

Nina Kiriki Hoffman developed The Story Catcher, a tool to generate random prompts based upon chance, specifically a roll of the dice.

Nina’s Story Catcher is a booklet where you collect words and phrases as you go through your day-to-day living, twelve words on a page, each page numbered in sequence.

To use the Story Catcher:

  1. Roll one or two standard dice.
  2. Select one or both dice to generate the page number. For page 11, one or both of the dice could total 11. For page 64, one die would be 6 and the other 4.
  3. Turn to that page number and roll again.
  4. Write down the resulting prompt from among the 12 on that page.
  5. Repeat this process three to five more times, noting each word or phrase generated.
  6. Using the resulting randomly generated words or phrase, write your prompt within a 15 minute time limit.

This process generates a completely random set of prompts. Examples might be: (more…)

NaNoWriMo: The Half-Way Point with the Tips, Tricks, Tools, and Resources to Finish

It’s the half way point in NaNoWriMo and our Prompt-a-Day project is also half way through, hopefully inspiring you to look at your writing and characters in a new way.

Writers in the Grove now has 10 members participating. One participated last year, so this is a huge leap and we are so proud of everyone.

Because our group is so diverse in writing subject matter, age, and skills, we’ve made a few adjustments to the NaNoNoWriMo guidelines. Those that are willing to stick with the word count as a score card are continuing to do so, report in to NaNoWriMo’s check in for the region. Those who are intimidated by such accounting have committed to write for a minimum of an hour a day.

The same challenges that face the word count writers face the timed writers. What to write, how to say it, self-doubt, self-worth, and the dark cloud of wonder about how this will ever amount to something. The challenge is to let all of that go and just write. Edit on December 1, but for November, just write and see what happens.

We’ve heard from several people that their goals of plotting first went by the wayside as their characters took over. Now they are pantsing it, just writing by the seat of their characters’ pants, as one described it. “I just hang onto my keyboard and hope they take this thing somewhere.”

In the Portland region, we are getting closer and closer to 16 million words for those keeping score. That’s amazing.

NaNoWriMo Day 12 Portland Regional Word Count Chart 2015

To keep the momentum going, we’ve put together some guides and helpful resources and wanted to share them with you.

Novels aren’t written by muses who come down through the ceiling and shoot magic through your fingers and out onto your laptop’s keyboard. Before NaNoWriMo, some teensy part of me still believed that because writing is a creative act, it should feel easy. But fairies don’t write novels. They’re written with one simple equation:

Time + Work = Novel

Stephanie Perkins on NaNoWriMo Blog on the rewards of not giving up on your story

NaNoWriMo Survival Resources – To Get You To the Half-Way Point

The following articles and guides should help you get to the half-way point, or help you through the rest of your month long writing experiment. It is an experiment. Sometimes you know where you are going, and sometimes you have no idea, and sometimes, both are true. Edit on December 1 but keep writing through the month and see where it takes you.

Along the way, hopefully the following will help, inspire, and motivate you.

Prompts and NaNoWriMo Ass Kickers

(more…)

NaNoWriMo: Beat Sheets and Story Engineering Worksheets

There are some terms you need to know if you will be participating in NaNoWriMo this year.

  • Plotter: A writer who plots out their story with an outline, which they tend to follow for the most part during NaNoWriMo.
  • Pantser: A writer tackling NaNoWriMo with little planning and forethought, just writing by the seat of their pants.

A few years ago, a new term arose, brought to light by Angela Quarles, self-labeled a Geek Girl Romance Writer. She also offers writing advice, tutorials, and tools to help writers.

In her post about her experience and the lessons learned, she describes the two key types of writers who participate in the National Novel Writing Month challenge, and invented her own type called plotser:

What’s a plotser? A cross between a pantser and a plotter, with maybe a wee bit more emphasis on the pre-plotting.

With Hurricane Sandy and other circumstances, my new agent (signed only on Oct 4) and I weren’t able to coordinate on what direction to take for a sequel to MUST LOVE BREECHES. So for most of October, I wasn’t even sure if I was participating in NaNoWriMo. Then at the end of the month, I decided to take up a premise that had nothing to do with BREECHES so I wouldn’t waste my time writing a sequel she didn’t want.

However, that meant I’d not spent time plotting at all.

I had what I thought was a fun premise and a sense of who the H/h were and so started one day late on November 2. I caught up with everyone over the weekend and was doing swimmingly until about Day 5, then my word count dribbled downward and things ground to a halt. I had no idea where I was going with this and I didn’t like feeling that way. This wasn’t the normal ‘what I’m writing is drivel’ feeling, I really felt like all my characters were just spinning their wheels waiting for something to happen. Like the plot. Ugh.

A local writer friend sagely advised me to take a break for a week, two weeks, to figure out the plot and then do a FastDraft blitz at the end. So I did! I ended up creating a spreadsheet to help myself stay focused on what I needed to discover…

As a result of her experience, she created the Story Engineering Worksheet (Excel Spreadsheet), a spreadsheet created in Excel that breaks down all the elements of a novel into their finest detail. To download, click, on the link or right click and save to your hard drive.

Described as a “mix of the four act/part structure, and beat sheets,” the worksheet is based on the spreadsheet by Jamie Gold called a beat sheet, a worksheet that structures your plot all on one page.

Described by Storyfix in their Lessons for Writers:

The “beat sheet” is a way to sequence your story, using bullets instead of whole sentences or paragraphs.

Yes, this is an outline, but it is more than that. It is a scene structure for your novel built around basic plot points or story arcs. (more…)

NaNoWriMo Novel Template for Scrivener

We’ve several members prepping for NaNoWriMo this year, the annual National Novel Writing Month where writers commit to write 50,000 words in 30 days through the month of November. We’ve put together “It’s NaNoWriMo Time: How To, Tips, Techniques, and Survival Advice” to help you as well.

For those using Scrivener to write and track their daily targets of 1,667 words, Scrivener is not only offered for 20% off during NaNoWriMo, but they also have a NaNoWriMo Novel Template to help you keep track of your progress.

Download and install the free (or paid) version of Scrivener. You will find all the information including tutorials and the template file on their Scrivener NaNoWriMo 2015 Offers web page.

NaNoWriMo Novel Template Setup.To install the NaNoWriMo Novel Template:

  1. Scroll to the bottom of the 2015 offers web page and look for the title The NaNoWriMo Novel Template
  2. Click or right click and save the ZIP file for the version of Scrivener you are using (Mac or Windows)
  3. Extract the scrivtemplate file to the directory where Scrivener is installed and the subdirectory called ProjectTemplates.
    • The location on your computer is typically C:\Users\UserName\AppData\Local\Scrivener\ProjectTemplates
  4. Open Scrivener and go to File > New Project
  5. Switch to the Fiction Templates
  6. Look for a template titled NaNoWriMo Novel Template and select it
  7. Type in a file name such as “My November 2015 Novel Draft” and choose the folder in which to store the files within your Documents folder
  8. Click Create
  9. The first document you will see contains all the instructions you need to understand how to use the template during NaNoWriMo.

NaNoWriMo Novel Template Instructions.

To get started on November 1, go to Project > Project Targets and drag that pop-up window to a location where it doesn’t interfere with your writing. Start writing, and glance over after 45 minutes or so to see how you are doing. (more…)

Scrivener Update Released

Literature and Latte, makers of Scrivener, have just released a new update. When you launch Scrivener, it will offer to update. Please do. If you have Scrivener open, either close and reopen it or go to Help > Check for Updates and install the latest update.

There are a few things you need to know about this update.

  • Not Backwards Compatible: If you create a project in Scrivener 1.9 (new version), it will not be readable in an older version of Scrivener. They have made signifant changes, so if you have Scrivener installed on multiple computers such as your desktop and laptop, update all of them.
  • Scrivener moving toward mobile version: The changes in the new update to Scrivener is a move to ready it for a mobile version.
  • Project File Names: In the past, project.scriv was the generic project file name. It will now use the project folder name rather than “project” to help you keep track of the project files better.
  • Inspector: The Inspector has been changed a bit to allow easier usage. A View > Inspect submenu has been added for different Inspector tabs, and multiple Inspector comments and footnotes maybe expanded and collapsed using the View > Outline commands.
  • Compile: Compile now recognizes tabs and carriage returns.
  • Tutorial Updated: Updates to the tutorial build into Scrivener now includes recent modifications and a new “Quick Start” collection.

Other improves include adjusting for Windows 10 and a wide variety of bug fixes to help Scrivener work better and run smoother.

As usual, when a maintenance or major version of Scrivener is released, it is free to registered users and it is essential to update immediately. Some of these updates may include security fixes. Also, Scrivener just keeps getting better and you don’t want to get left behind.

They’ve also updated some of their Scrivener Video Tutorials to help you stay updated or learn new techniques in Scrivener.

We will be adding more Scrivener tutorials to the site soon, and plans are in work for another Scrivener workshop coming to Forest Grove, Oregon, soon.

Don’t have Scrivener yet? Scrivener will be on discount in anticipation of NaNoWriMo (National Novel Writing Month). Regularly USD $40, NaNoWriMo participants may buy Scrivener for 20% off. If you complete and win NaNoWriMo (write 50,000 words in 30 days), they will send you a coupon for 50% off Scrivener.

NOTE: Scrivener requires Microsoft C++ Runtime to be installed on your computer. If you are having problems with the installation, ensure that it proberly installed and reboot your machine before running Scrivener or the installation/update again.

Scrivener: Names and Autocomplete

In this ongoing series on Scrivener, you should have the basics under your belt. Let’s dive a little deeper into those basics with your new imported project or with the blank project we created early on in these tutorials. In this tutorial I’ll cover the Name Generator and Autocomplete Suggestion features in Scrivener.

One of the great tools Scrivener includes is a Name Generator. It helps you to generate possible character names.

To access it, go to Tools > Writing Tools > Name Generator.

Scrivener - Tools - Options - Writing Tools - Name Generator - Lorelle

The Name Generator generates random character names and can be customized to generate names specific to region and cultural areas for male, female, or both. You can set the the generator by first and last name letters or include specific letters. You can even search for names with specific meanings. (more…)

Scrivener: Import Documents and Files

Throughout this ongoing series on Scrivener so far, you’ve been experimenting with a blank project. I highly recommend my students learn first with a blank project so they can screw it up and experiment thoroughly before they start importing their own writing. Few listen. Either way, it’s time to talk about how to import your writing into Scrivener, and practice first on your experimental project.

There are two ways to get your content into Scrivener.

You can copy and paste from your word processor. Take care doing this as it will often bring in code and formatting that you might wish to remove later. You can also import the content directly into Scrivener.

We will cover both methods, but to do this right (or at least wiser), start with formatting a blank Scrivener project.

Remember, importing your writing into Scrivener makes a copy of the original files. It does not modify them. They remain untouched. Save them off your computer in a protected and secure place as backups.

Formatting a New Project

Go to Tools > Options > Editor.

Scrivener - Options - Editor - Interface - Lorelle

This is where you format Scrivener for what you will use on the screen. This is NOT how the document will look when published. Get that thought out of your head immediately.

The Editor creates your writing environment. How do you wish to write? Single spaced lines? Double spaced? Wide margins? Narrow? Indented paragraphs? Not? Large fonts? Serif or sans-serif fonts?

With the Editor, you can set up a writing environment the way you wish to write. When the writing is compiled (exported), you may control the end result there.

Changing the formatting of the Editor is best done before you add your writing. It applies only to new documents, not previous ones. I’ll cover how to fix the older styles and formatting in another tutorial. (more…)